ШчКЮдкUbuntu18.04ЯЕЭГЙвдиДХХЬ
ШчКЮдкUbuntu18.04ЯЕЭГЙвдиДХХЬ
дкUbuntu18.04ЯЕЭГжаЃЌШчКЮНјааДХХЬЗжЧјКЭЙвди?БОЮФНЋеыЖдДЫЮЪЬтНјааЯъЯИЫЕУїЁЃ
ШчЙћаТЛњЦїЕФашвЊЙвдиЪ§ОнХЬЕФЛАЃЌашвЊЖдЪ§ОнХЬНјааЗжЧјКЭИёЪНЛЏКѓВХФмЙЛЙвдиЁЃ
1.ЪзЯШВщПДЕБЧАЫљгаЕФДХХЬаХЯЂ
fdisk -l
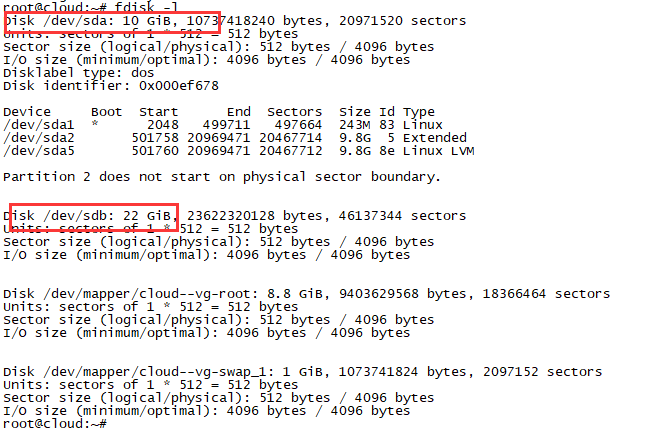
ПЩвдПДЕНгаsda КЭsdbСНИіХЬЃЌЦфжаsdaЪЧЯЕЭГХЬЃЌsdbЪЧЮвУЧвЊЙвдиЕФЪ§ОнХЬЃЌЛЙУЛгаЗжЧјДцдкЁЃ
2.жДааsudo fdisk /dev/sdbЖдsdbДДНЈЗжЧјЁЃ
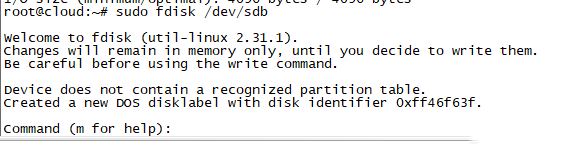
АДmПЩвдЛёЕУАяжњЃК

3.ЮвУЧбЁдёЪфШыn ДДНЈвЛИіаТЕФЗжЧј
ШЛКѓЦфЫћШЋВПФЌШЯ

етРяpДњБэДДНЈжїЗжЧјЃЌeДњБэДДНЈРЉеЙЗжЧј
ЫЕУїЃКвЛПщДХХЬзюЖржЛФмга4ИіжїЗжЧјЃЌвЊДДНЈИќЖрЕФДХХЬжЛФмбЁдёДДНЈРЉеЙЗжЧјЁЃЮоТлДДНЈСЫМИИіжїЗжЧјЃЌРЉеЙЗжЧјЕФађКХБиЖЈДг5ПЊЪМЁЃ
ЗжЧјЩшжУЭъжЎКѓЪфШыwЃЌБЃДцДХХЬЗжЧјЩшжУ
етбљвЛИіаТЕФЗжЧјОЭНЈСЂКУСЫ
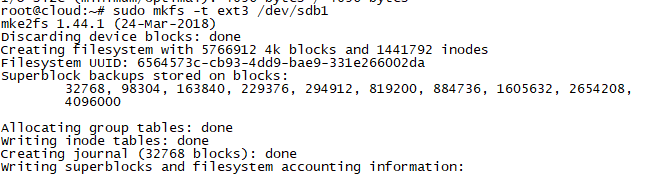
4.НгЯТРДЖдЗжЧјНјааИёЪНЛЏ
sudo mkfs -t ext3 /dev/sdb1
5.ИёЪНЛЏЭъГЩПЩвдЖдЗжЧјНјааЙвдиСЫ
mkdir /data #ДДНЈЙвдиЕу
mount /dev/sdb1 /data #НЋДХХЬЮФМўЙвдиЕН/dataЩЯ
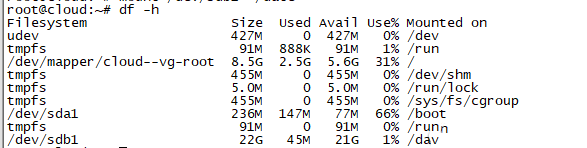
6.ВщПДДХХЬuuid

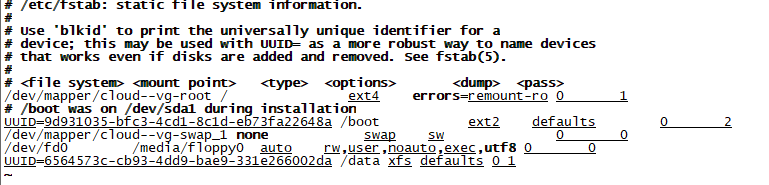
7.НЋЗжЧјаХЯЂаДШы /etc/fstab ЮФМўПЊЛњЦєЖЏКѓздЖЏЙвдиЃК
sudo vim /etc/fstab
дкзюКѓвЛааМгШы
UUID=ДХХЬuuid /data xfs defaults 0 0
ЫЕУїЃКИёЪНЮЊ[ДХХЬЮФМў Лђ uuid] [ЙвдиЕу] [ЙвдиДХХЬРраЭlinuxЮЊxfs windowsЮЊntfs] [ЙвдиВЮЪ§ФЌШЯdefaultsМДПЩ] [ДХХЬМьВщФЌШЯ0МДПЩ] [ДХХЬМьВщФЌШЯ0МДПЩ]
8.аоИФЭъ/etc/fstabЮФМўКѓЃЌдЫаа
sudo mount -a
ХфжУЭъГЩ
ЯрЙиЭЦМі
аТМгЦТЖрIPЗўЮёЦїЖрIPИКдиОљКтХфжУжИФЯ?
ШчКЮВтЪдаТМгЦТЖрIPЗўЮёЦїИїIPЕФецЪЕДјПэ?
аТМгЦТЖрIPЗўЮёЦїжаФГИіIPЫйЖШЬиБ№Т§ЕФдвђ?
аТМгЦТЖрIPЗўЮёЦїДјПэХмТњЕФгІМБДІРэЗНАИ?
аТМгЦТЖрIPЗўЮёЦїЗУЮЪжаЙњбгГйИпШчКЮгХЛЏ?
ЬЈЭхЖрipЗўЮёЦїIPЕижЗГхЭЛЕМжТЗўЮёжаЖЯЕФДІРэАьЗЈ?
ШчКЮХњСПМьВтЬЈЭхЖрIPЗўЮёЦїIPПЩгУад?


